Table of Contents
Armada 1 Game Interface
General Interface
Normal View
This is how the in-game interface looks like for the normal view:
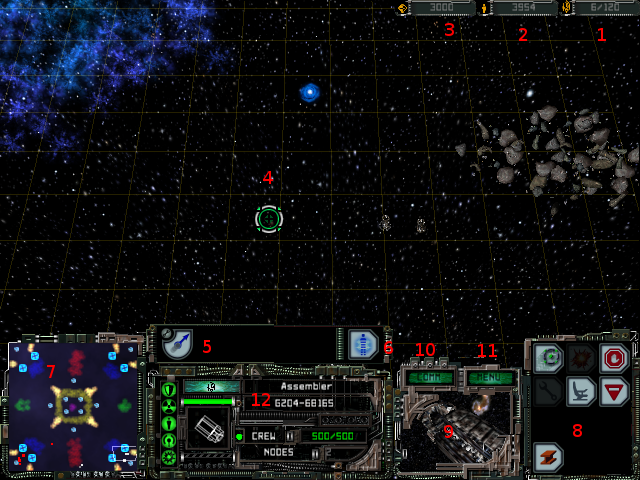
It shows you the top-down view of the tactical map and is pretty much identical for all factions. Just the styling of the interface elements is a bit different. It presents a lot of functions and information sources:
- Supply values, left number is the amount in use, right number is the current maximum.
- Available crew.
- Available dilithium.
- Cursor, used to pick units, sending them, and targeting their weapons, issuing commands and moving the view perspective.
- Unit Button Bar, can show up to five different special weapon buttons. Their order also gives you the number of the F-key, activating it. So fourth from the left button can be activated by the
F4key. Only exception is the special weapon five (e.g. super weapon of the Romulans).F5is reserved for cloaking. But due to the Phoenix Bug the cloak is not available for the Phoenix. - Transport button, beams crew over to the target ship, five crewmen per second.
- Strategic map, shows all visible units, map objects. When an event happens (e.g. attack by an opponent), a small circle around the position is drawn, getting smaller to guide the eyes to the place of the action. Can also be used, to click on, to get to the pointed position on the map. That goes also for sending ships. So there is a difference between right- and left-clicking, depending on how you configured the corresponding setting.
- Command Button Area, can contain several function buttons and menu buttons, depending on what unit you currently use.
- Cinematics Window, showing you different places where something is happening. When double clicking on it, you jump the, in the cinematics (=free look) mode. You can also toggle this with
CTRL+y. Shows nothing, if you set that in the graphics settings, described above. - COMM menu button, opens the Communications menu
- MENU menu botton, opens the ingame main menu
- Unit details: this part is by default black (when you have selected nothing). When selecting one unit, it shows you (from the top) the state of your shields, engines, life support, sensors and weapons system on the left hand side. If one of these five symbols flashes yellow, it means, that this system is temporarily offline (e.g. due to being hit by a special weapon or being inside a corresponding nebula). If the system is red, it means, it is damaged. Next you can see a mesh depiction of the unit. If some systems are damaged, it is also depicted there. Also some of the special weapons being effective is shown here (e.g. Romulan Spy and Klingon Gravity Mines). The green bar on the op side shows the shield energy. If only grey, shields are fully down. The striped bar below is the state of the current production/construction. The green-blueish bar above the shields bar is the factions bar (in this case: Borg). It shows the color of the team as well as the icon of that faction. The nodes-area shown can also be the Officers or Centurions, meaning the amount of supply this unit uses, see also upper right corner of the screen. Crew obviously shows you, how many crewmen are on board. Once this drops to zero, all systems are taken offline. On the right upper part of this section you can also see the name of that unit. In multiplayer this means nothing. In some missions of the single-player this is important, as you might have to guard a certain building or unit, or have to get a certain unit or item to a specific position on the map.
Cinematic View
The cinematic view uses a unit as a reference point and shows the map from a spot near that unit. The interface looks like this:
The unit details are turned invisible, as well as the better part of the the cinematic window. You can toggle the normal view and cinematic view with either pressing z (or y on QUERTZ layouts) or double click the visible parts of the cinematic window.
COMM Menu
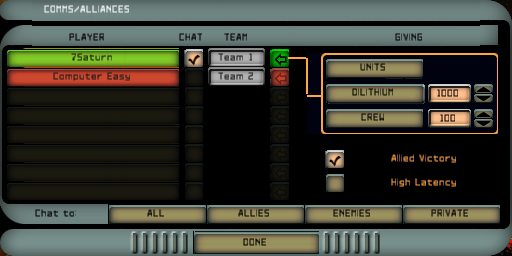
This menu serves multiple purposes. It shows you, what team a player belongs to, defines where chat messages should go and let's you give resources to other players.
On the right hand side, the UNITS, DILITHIUM and CREW buttons transfer the corresponding amount/units to the selected player. You select a player by clicking on the arrow right to his name. Note: You cannot give another player one of your construction ships.
The checkbox on the left of the Team badge defines, whether you want to chat with that player. You can also filter this with the buttons ALL, ALLIES, ENEMIES and PRIVATE on the bottom of the window.
The checkbox Allied Victory is important, if you do not play in fixed teams but in allies mode. If checked by all members of the remaining ally group, the game ends automatically with a win of that group, if only players from that group are still in the game.
Controls
Most functions can be used by the keyboard by using your mouse. However, some require one or the other or both at once. Many keyboard commands are hinted, when hovering over a button with the mouse pointer. An underlined character indicates the key to be pressed for activating the function. This underlining may be very thin, when playing on high resolutions, e.g. 4K. This may make spotting it a bit difficult.
There is one flaw with that system when using another keyboard layout than the English: Some units show you buttons that are not necessarily correctly labeled in terms of key usage. E.g. the yard build command is generally depicted as to be issued with y. On a QWERTY layout that's correct. But when using a QWERTZ layout (e.g. German keyboard) then it is actually z (the same position on the keyboard, but in fact a different key). Those two are in general swapped. For example also the cinematics view is not activated by z but by y.
Here is a selection of things you can do:
Keyboard Controls
General Keyboard Controls
| Key(s) | Effect |
|---|---|
CTRL + x | Opens the in-game main menu. |
e | Selects every unit currently visible on the tactical map. If there are more than 8 units visible, the selection is arbitrary. |
n | Selects the next unit currently visible on the tactical map. |
g | Toggle grid on or off. |
b | Either return from a sub menu from the right menu or open the build/research menu when having a station selected, that can either build units or research items. |
y / z | Toggle cinematic view. On a QWERTZ layout it is z, on a QWERTY Layout it is y. |
Changing the Interface Layout
One thing that is not immediately obvious is the fact that you can turn on and off different parts of the interface and can also re-arrange the different parts of the interface. By holding the ALT key you can drag the interface elements somewhere else. You can reset these changes to standard by entering CTRL + ALT + F9.
If you do not require a certain interface element, e.g. the cinematic window, you can turn them invisible by pressing CTRL + Fnumber. This also works with ALT instead of CTRL but sometimes when using ALT + F4 the game actually quits, instead of toggling the cinematic window on or off. When positioning the mouse pointer at the screen borders where a hidden element is positioned, it will appear temporarily. This only works, if the element is close enough to the screen borders itself. These are the keys for the different elements:
| F-Key | Effect |
|---|---|
| 1 | Toggles Mini Map |
| 2 | Toggles Unit Details |
| 3 | Toggles Unit Button Bar |
| 4 | Toggles Cinematic Window |
| 5 | Toggles Command Button Area |
| 6 | Opens COMM Menu |
| 7 | Toggles Resources Pane |
Control Groups
You can assign up to eight units to a so-called control group. When pressing the digit key of a control-group, all units assigned to that group are selected. Here is a list of commands you can use with that feature:
| Key(s) | Effect |
|---|---|
CTRL + Number | Assignes the currently selected units or station to the control group with number number. If nothing is selected, the control group will be emptied. |
Number | Selects the units or station assigned to the control group with that number. If nothing is assigned to that control group, anything currently selected will be de-selected. |
2 x Number (in short succession) | Selects the units or station assigned to the control group with that number and jumps to the balance point of the group/station. When doing this too fast, it will not work. When doing this to slowly it will also not work. |
F-Keys 1-5 | Activates the special weapon slot (1 is the most left, 5 the most right) |
t | Transports (beams) to an object. |
Change Perspective in Normal View
When pressing one of the following keypad keys on the keyboard, the perspective will be changed, when in Normal View:
| Key(s) | Effect |
|---|---|
→ | Move the section of the map shown on the tactical map to the right. |
← | Move the section of the map shown on the tactical map to the left. |
↑ | Move the section of the map shown on the tactical map to the top. |
↓ | Move the section of the map shown on the tactical map to the bottom. |
* | Turn the section of the map shown on the tactical map clock-wise. |
/ | Turn the section of the map shown on the tactical map counter-clock-wise. |
+ | Zooms in |
- | Zooms out |
Change Perspective in Cinematics View
| Key(s) | Effect |
|---|---|
→ | Turn the section of the map shown on the tactical map clock-wise. |
← | Turn the section of the map shown on the tactical map counter-clock-wise. |
↑ | Tilt the camera up. |
↓ | Tilt the camera down. |
- | Increases camera altitude. |
+ | Decreases camera altitude. |
Mouse Controls
General Mouse Controls
There are a variety of mouse commands you can issue. This section assumes you are using the default setting in the Game Settings, left-click for selection and right-click for issuing move and attack orders. If you switched this, then left and right may have to be switched here, too.
- Left click on a clickable button (not greyed out): uses this button. If the button changes the mouse pointer to another icon, it will be a two-part command, requiring another target to use the function on. If you use the same button again, the cursor will return to normal and the function aborted.
- Double-Left-Click on a unit: Selects up to eight units currently visible on the tactical map.
- Left Click on the strategic map: Move the view point to that location on the map. The camera movement is instant (jumping).
- Right Click on the strategic map: When currently issuing a special weapon command that requires a map target point (e.g. Transwarp Drive), you can specify the target also on the strategic map, but only by right-clicking.
- Right-click when having a unit selected: Sends the unit to that position or attack that unit or station. If a group is selected, the units are spread around that point or attack the same object. Works also on the strategic map.
- Left Click Dragging the mouse pointer on the tactical map: Rectangle select: All units enclosed by the dragged rectangle will be selected. If no units but only stations are enclosed, the selection of the station is arbitrary. If there are more than 8 units enclosed, the selection will also be arbitrary.
- Left Click Dragging the mouse pointer on the strategic map: Moves the camera view point continuously over the map, tracking the position of the mouse pointer on the map.
View Mouse Control When in Normal View
- Moving mouse pointer to the screen's borders: Moves the section of the map shown on the tactical map into the direction of the border orientation.
- Right-click and drag: Moves the section of the map shown on the tactical map into the direction of the drag. Only does so, while actively moving the mouse pointer.
- Right-Left-click then dragging the mouse pointer: Zooms or turns the view perspective, depending in which direction the mouse is moved at first.
View Mouse Control When in Cinematics View
- Moving mouse pointer to the screen's borders: Turns the camera view angle into the direction of the border orientation.
- Right-Left-click then dragging the mouse pointer: Zooms in or out.
Combined Controls
SHIFT+ selection of units: Adds the newly selected units to the current selection. If that would make more units than 8 for the selection, the units added to the selection is arbitrary.TAB+ sending a unit: Sets waypoints for the currently selected units they will follow one after another.